How to Start a Travel Blog
Are you wondering how to start a travel blog and make money blogging? You’re in the right place!
I started Stay to Wander several years ago and since then, I have turned it into a profitable business. But Stay to Wander is actually not my first travel blog — I started two other successful travel blogs before this, both of which I eventually sold. As you can tell, I love writing about travel (and getting paid to do it!)
With three profitable travel blogs under my belt, I’m now sharing my best tips with you. This guide will show you exactly how to start your own travel blog today, and how you can make money from it.
Even if you just want to start a travel blog for fun, you can follow the steps in this guide to get started. But be sure to read until the end if you want to learn the best ways to monetize a travel blog too.
The great thing about starting a travel blog is that it’s super inexpensive. The only cost you need to pay is $23.88 for a year of web hosting with Bluehost. You can spend an additional $50 to $150+ on a premium WordPress theme for your blog, although there are plenty of free options you can start out with too.
Aside from that, there’s very minimal investment required in starting a blog, but a high potential for profit.
Ready to get started? Keep reading to learn how to start your travel blog today!
Step 1: Choose a Niche
Your niche is simply the topic you blog about. While “travel” itself is a niche, it can help you to stand out from the crowd if you narrow your focus even further. Here are some ideas for travel blog niches:
- Budget travel
- Luxury travel
- Traveling with kids
- Solo female travel
- City- or country-specific travel
- Eco-friendly travel
- Travel and food
- Travel and fashion
- RV travel
- Cruise travel
- Theme park travel
- Hiking and national parks
- Expat life
You get the idea! You don’t need a specific niche, though. I write about many different topics and cover destinations around the world on Stay to Wander, for example. But if you have a particular area of expertise or a passion about one travel-related topic, you can certainly focus on just that.
Step 2: Choose a Name
After you have decided on your niche, it’s time to choose a name for your travel blog! It’s important to choose a good name, because it’s the first impression your blog will give. (And it’s hard to change later!)
Your domain name is just your blog’s .com address on the Internet.
How to Pick a Name
Here are some tips for how to pick a good domain name for your travel blog:
- Make your name easy to spell and say. Don’t use misspelled words, numbers, or hyphens in your domain name. All of these things will make your name a lot more confusing and hard to remember.
- Make sure that the .com of your chosen name is available. Try to avoid alternative domain name endings like .net or .co because they are less common, harder to remember, and less trustworthy.
- Make it travel-related. For example, Adventurous Kate or The Blonde Abroad.
- Keep it professional. Don’t end up like travel blogger Drew from The Hungry Partier, who had to rebrand his entire blog because the name he chose in his twenties was impacting his ability to work with brands. Choose a name that sounds professional rather than immature or gimmicky.
- Use your own name. If you can’t think of a catchy name for your blog, using your own name is always a simple solution, and a good idea for building a strong personal brand.
- Pick something you can grow with. The name “Traveling with Toddlers” might be a good choice now if you have toddlers, but what about in a few years when your kids are older? A name like “The Traveling Family” or “Have Kids Will Travel” might be a better fit for your blog instead.
- Don’t overthink it. Try not to spend too much time on this step or worry about picking the “perfect” domain name. Chances are, whatever name you pick will grow on you and start to feel like a great fit.
If you can’t decide on a name yet, that’s okay! You can still start your blog today. Then you can come back and choose one later within 30 days after you sign up for web hosting with Bluehost.
Step 3: Get Web Hosting
If you want to make money as a travel blogger, you will need to have a self-hosted blog. This means that you own all of your content and your blog is totally yours, as opposed to using a hosted platform such as Blogger, Wix, WordPress.com, etc. where you don’t have full control or ownership
Even if you are not a very technical person, setting up web hosting is extremely simple and only takes a few minutes. First, you will need to choose a web host. I use and recommend is Bluehost.
Here are a few reasons why I like Bluehost:
- They have some of the most affordable web hosting plans out there.
- You can get your domain name for free with them (as opposed to paying $15 to $20 extra for one.)
- Their service is reliable and robust, so you will never have to worry about your website going down.
- Many of the most successful bloggers I know use Bluehost.
- They have great customer support and I have always had my questions answered quickly.
Bluehost has very generously offered web hosting packages starting at just $1.99 a month for readers of Stay to Wander, along with a FREE domain name for your first year.
To get this special pricing, just be sure to use any Bluehost link in this article!
Here’s how to set up web hosting with Bluehost:
1. Click here and then click the “Get Started” button:
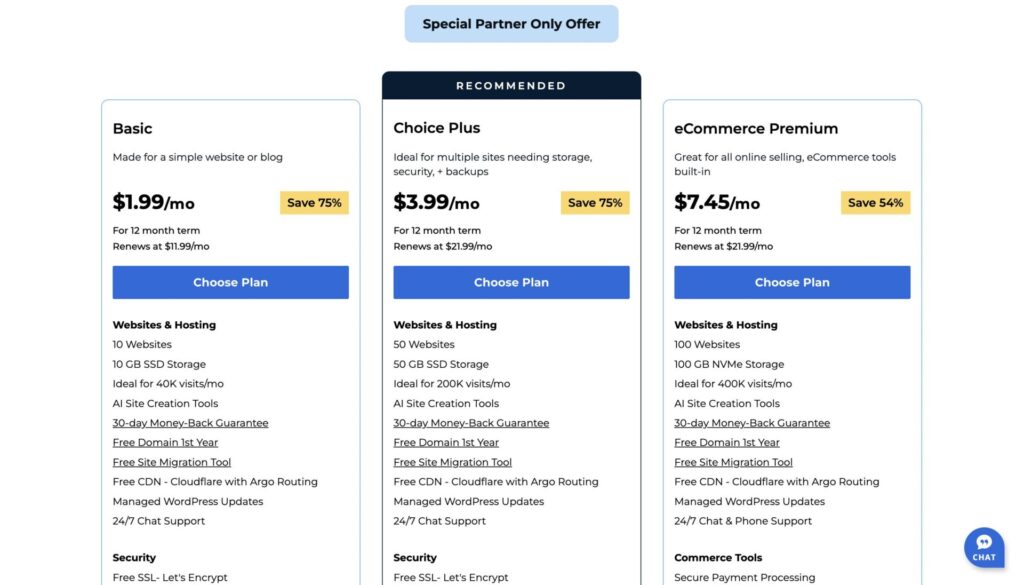
2. Select your hosting plan
Which plan should you choose? I recommend the Basic plan for new bloggers.
I’m personally on the Plus plan, but that’s only because I run multiple blogs and need the extra space. Otherwise I would probably choose the Basic plan. It has everything you need as a new blogger.
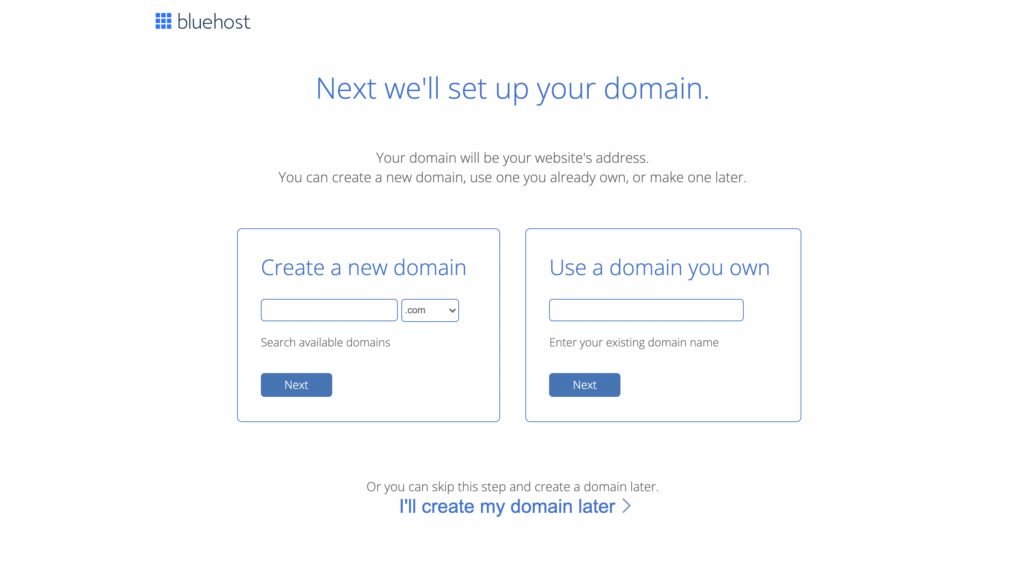
3. Put in your domain name
This is where you’ll put in the domain name that you decided on earlier.
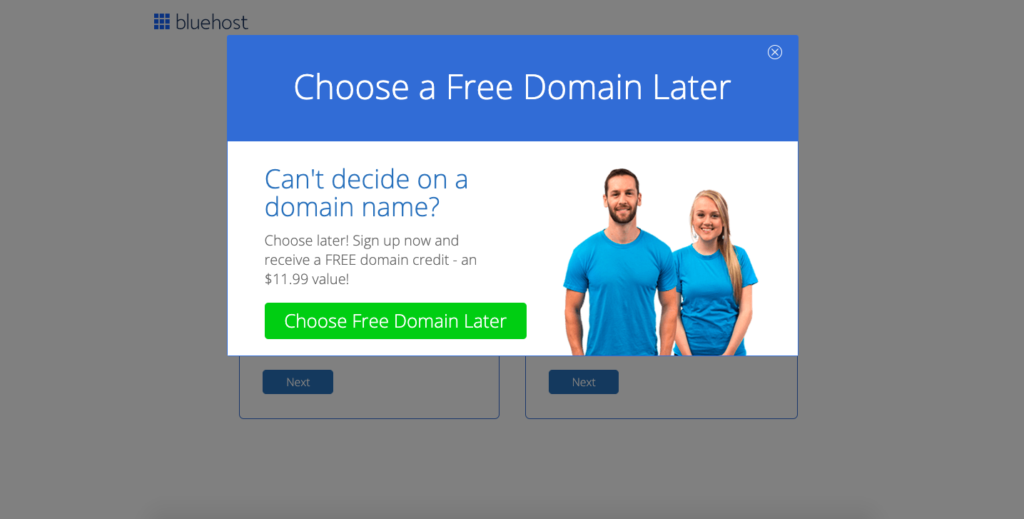
What if I haven’t decided on a name yet? If you haven’t decided on a domain name for your blog yet, click “I’ll create my domain later.” Or you can wait a couple seconds and this offer will pop up:
Select this option and you can go ahead and set up your blog now, then use the free credit to buy your domain name later. This gives you some extra time to decide on a name for your travel blog.
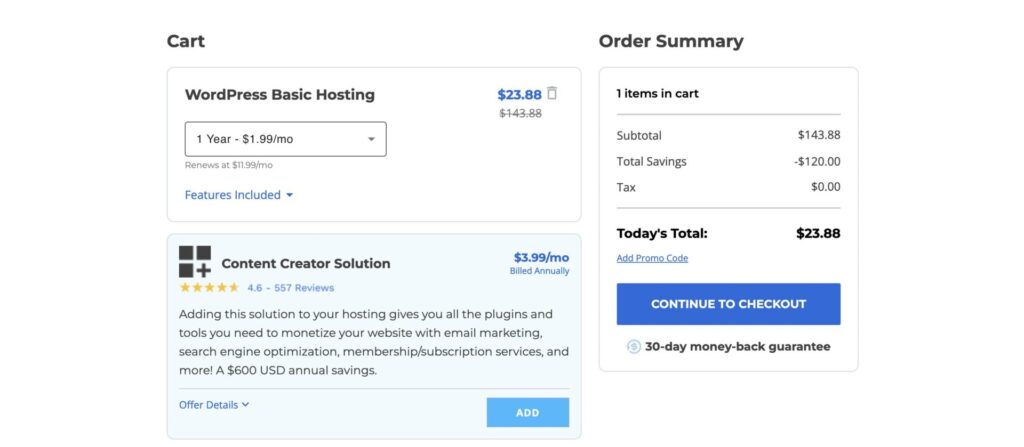
4. Choose your package and pay
This is where you’ll select your hosting plan.
I recommend the 12-month plan for $1.99 a month, for a total cost of $23.88 for the first year. But you can also choose a 24-month or 36-month plan if you want to lock in this rate for several years.
What about package extras? You have the options to add on extra paid services like site backups, SEO tools, or site security. I personally don’t recommend any of these paid extras, because there are free WordPress plugins you can install that do the same things. So you don’t actually need any of these!
5. Congrats, you’re done!
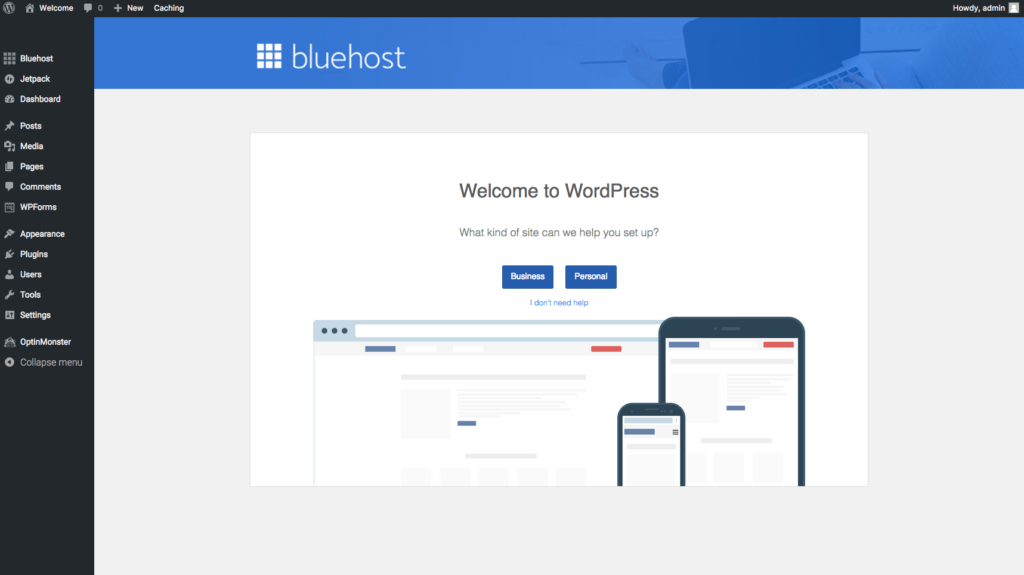
Now you’re all set! Bluehost will automatically install WordPress for you.
What exactly is WordPress? WordPress is the content management platform that your blog will run on. Your WordPress dashboard is where you will go to edit the design of your blog, write blog posts, upload images, and so on. WordPress is extremely easy to use, even if you’re a total beginner.
Step 4: Design Your Blog
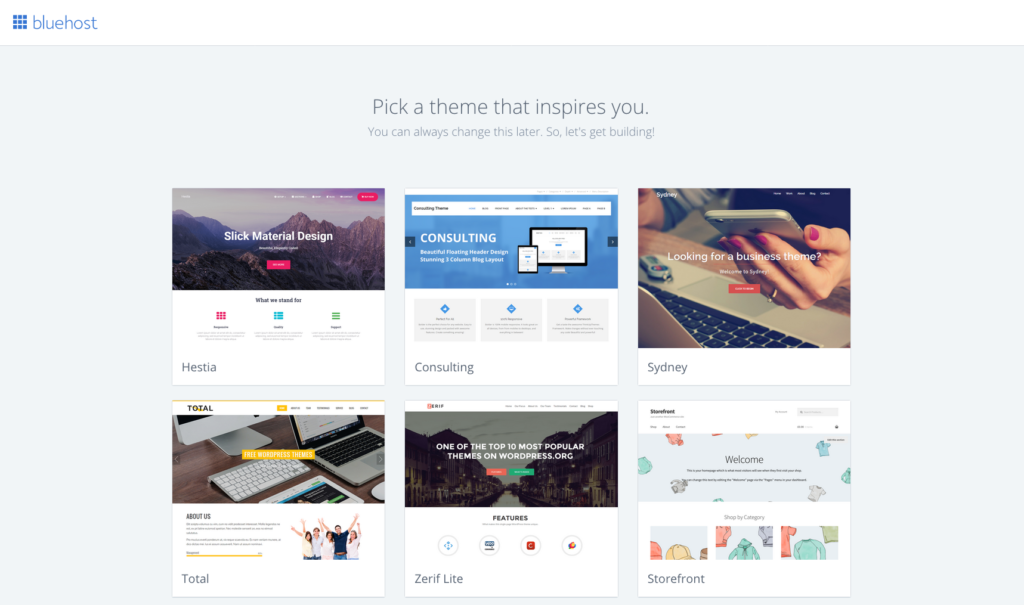
Now it’s time for the fun part — designing your blog! When you log in to your WordPress dashboard for the first time, you will be prompted to go ahead and choose a WordPress theme for your blog:
You can pick one of these default themes if you want, but I don’t recommend it.
For one, the majority of these free default themes are not designed with bloggers in mind. Most are designed for business websites. Additionally, choosing a premium theme over a default theme will make your blog look more professional right from the start. It’s worth the investment in a premium theme.
Here are the benefits to choosing a premium theme for your blog:
- They come with step-by-step set-up instructions.
- You will have access to customer support from the theme creator.
- Paid themes come with crucial features like a mobile responsive design and customization options.
- Your blog will look prettier and more professional.
Personally, I’m using a WordPress theme from 17th Avenue on my blog.
These stylish WordPress themes are perfect for travel bloggers. I’m using the Audrey theme on my blog.
Installing your WordPress theme
To install your theme, go to Appearance > Themes in the lefthand menu of the WordPress dashboard:
Then simply upload your theme file and install it.
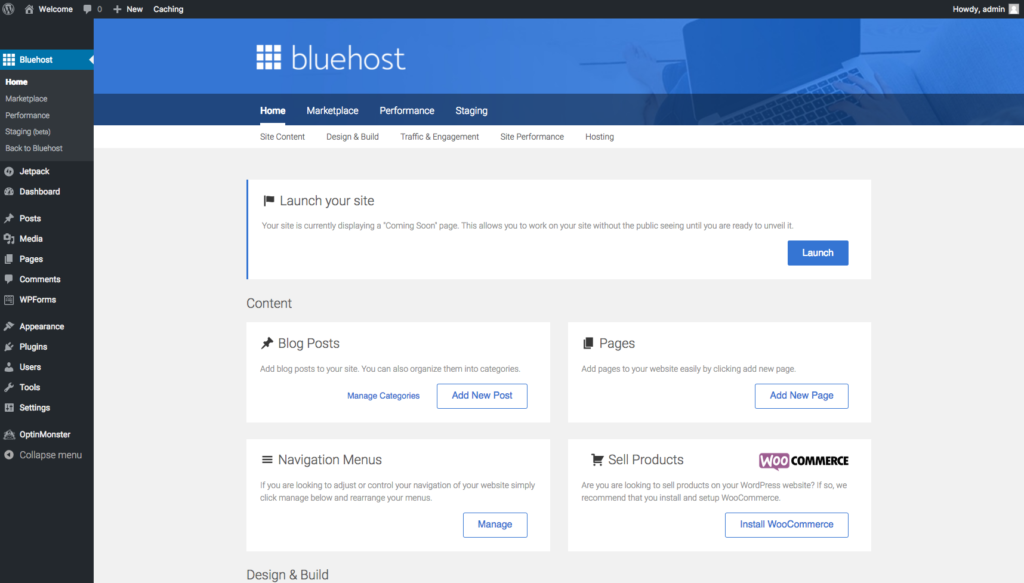
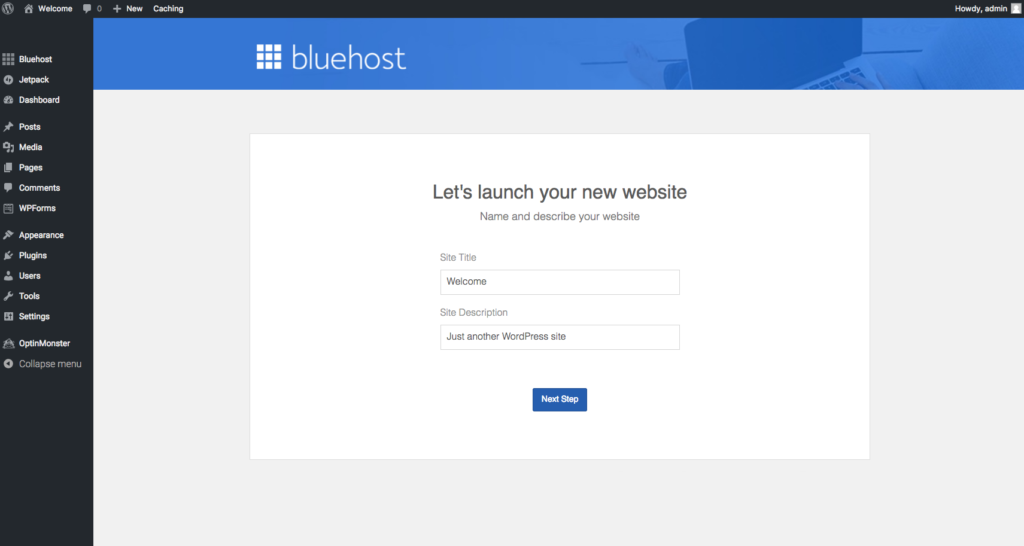
Once you have installed your theme and are happy with the way everything looks, you can go ahead and launch your blog! Until you follow this step, your blog will just display a “Coming Soon” landing page.
To launch, go to the Bluehost menu on the top left of your WordPress dashboard:
All you have to do is fill in this info and you’re good to go:
Congrats! Your travel blog is now live.
Step 5: Start Blogging!
Once you have launched your blog, it’s time to write your first blog post.
There are a lot of things you can write about as a travel blogger. Here are some ideas to get you started:
- Destination guides (what to do, where to stay, where to eat, etc.)
- Top 10 lists (top 10 things to do in a city, top 10 beaches in a country, etc.)
- Travel packing list for a specific destination
- Review your favorite travel products, hotels, cruises, airlines, etc.
- Travel tips (ex. how to save money on travel)
You can take a look at my blog for an idea of how to structure your blog posts. Basically, you want to write helpful content that answers a question, solves a problem, or provides inspiration for your readers.
There’s no minimum or maximum word count for a blog post, but I personally always aim for at least 1,000 words, although some of my longer blog posts (like this one!) end up being well over 2,000 words.
You should break up your blog posts using headings, short paragraphs, bullet points or lists where helpful, and plenty of images. Since travel is a very visual niche, having great photos is important!
When you first start your blog, I’d make it a goal to write at least 20 blog posts as soon as you can.
How Travel Blogs Make Money
Now let’s talk about how you can make money from your travel blog! Once you’ve published 20+ blog posts and gotten the hang of things, you can start taking steps to monetize your blog.
These are the best ways to make money with a travel blog:
Affiliate Marketing
Affiliate marketing is an arrangement where you earn a commission if someone makes a purchase through an affiliate link on your blog. For travel bloggers, you can earn money by recommending hotels, tours, travel gear, travel insurance, and more. This is a great way to make passive income from your blog.
For example, I have a lot of guides about where to stay in different destinations on my blog. Every hotel I recommend is an affiliate link, so if someone makes a booking, I earn a percentage commission.
Two of the best affiliate platforms for travel bloggers are Stay22 and Travelpayouts. Both are free to join, and give you access to many different travel affiliate programs. Both platforms also automatically convert any links on your blog into affiliate links, as well as offer other tools to help you increase conversions.
Display Ads
You know when you’re browsing a website and you see advertisements in between paragraphs, in the sidebar, at the bottom of the page, and so on? Those are display ads, and they can be very profitable!
As a blogger, you can join an ad network and earn money from displaying ads on your blog. For new bloggers, the best ad network to join is Journey by Mediavine. You can apply at any time, and once your blog is ready to start showing ads, they will notify you and help you get everything set up.
You get paid based on how many people view your ads, with what is known as an RPM (rate per 1,000 views.) RPMs vary based on a variety of factors, but you can expect to earn anywhere from $10 to $50 RPM.
Sponsored Content
Sponsored content is another way to make money. Travel bloggers can work with brands on sponsored posts, where a brand pays a blogger to publish sponsored content on their blog or social media channels.
In the travel blogging world, this typically involves partnering with travel-related brands like hotels, airlines, tour companies, or local tourism boards. Once you have an established audience, you can start looking for sponsored content opportunities or even pitch travel brands and tourism boards yourself.
Personally, I only do a little bit of sponsored content because I find that it’s not as passive as affiliate marketing or display ads. Although it does require more active work, it can be very lucrative.
Selling Products or Services
Finally, one more way you can make money as a travel blogger is by selling your own products or services. There are a lot of options for products and services you can offer, and room for creativity here.
You can sell passive income digital products, like travel guides, printable travel planners or checklists, photo editing presets, online courses, ebooks, and more. Have a special area of expertise, like travel hacking with credit card points and miles? That’s something you can easily turn into a digital product!
You can also offer services like travel planning or custom itinerary creation. I’ve seen travel bloggers branch out even further by running group trips or retreats, or becoming licensed travel agents.
How to Start a Travel Blog
So that’s all there is to it! Starting a travel blog is a lot of fun and very rewarding.
As a recap, here are the steps you need to take to start your own travel blog:
- Decide on your niche.
- Choose a domain name.
- Register for web hosting from Bluehost.
- Choose and install a WordPress theme.
- Write 20+ blog posts.
- Start monetizing your blog.
Good luck and happy blogging!
Related Guides:
